
How Easy Is It to Replace a Garage Door Opener? A DIY Guide
Introduction
When it comes to home maintenance, few tasks seem as intimidating as replacing a garage door opener. The thought of dealing with electrical components, heavy doors, and potentially dangerous springs can make anyone hesitate. However, with the right guidance and a bit of elbow grease, you might find that it's easier than you think. In this comprehensive guide, we will explore the ins and outs of replacing a garage door opener, enabling you to tackle this DIY project with confidence.
But first things first: why would you want to replace your garage door opener? Perhaps it's malfunctioning or has become outdated. Maybe you're looking for increased security features or improved convenience. Whatever the reason, understanding the process can save you money and give you a sense of accomplishment.
So how easy is it really? Let's dive into the details!
How Easy Is It to Replace a Garage Door Opener? A DIY Guide
Replacing a garage door opener isn’t as complicated as it sounds. With some basic tools and a little patience, it can be an achievable task for many homeowners. To begin with, let’s break down the main steps involved in this process:
1. Understanding Your Garage Door Opener
Before diving into replacement, it’s essential to understand how your current garage door opener works. Most openers operate using one of three mechanisms:
Knowing which type you have will help when selecting a replacement model.
2. Recognizing When It's Time for Replacement
Several signs indicate that your garage door opener may need replacing:

- Frequent breakdowns
- Unusual noises
- Difficulty in opening or closing the door
- Age (most last about 10-15 years)
If you’re experiencing any of these issues, it might just be time to consider a new unit.
3. Choosing the Right Garage Door Opener
With numerous options on the market, how do you choose? Look for features like:
- Smart technology compatibility
- Battery backup systems
- Enhanced security features
Consider consulting professionals who provide garage door services near me or searching for reviews online for garage door services Los Angeles to gather insights from other users.
4. Gathering Tools and Materials
Before starting your project, ensure you have local garage door opener services everything necessary:
- New garage door opener
- Screwdriver set
- Ladder
- Level
- Safety glasses
- Wrench set
Having all your tools ready will make the installation smoother.
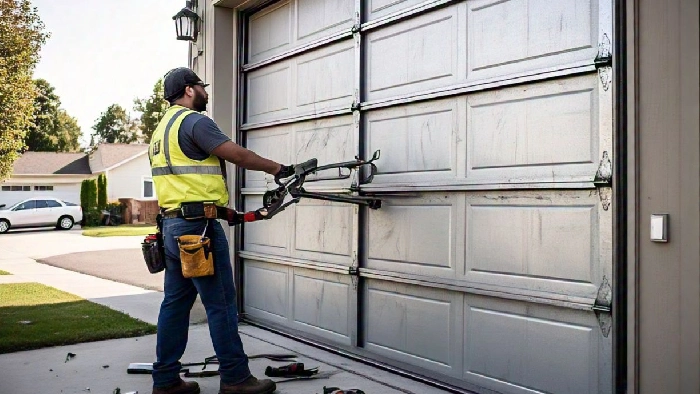
5. Disconnecting the Old Opener
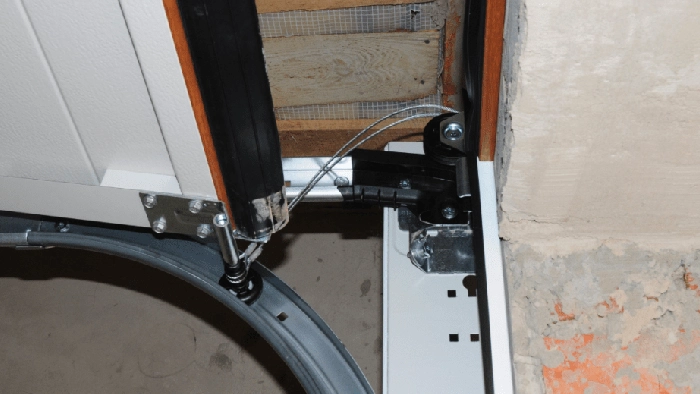
Start by unplugging the old unit from its power source and detaching it from the wall brackets and rail system. Be cautious; if there are any springs involved (like torsion springs), it's best to consult with professional garage door services to avoid injury.
6. Installing the New Opener: Step-by-Step Instructions
Common Mistakes During Garage Door Opener Replacement
Even seasoned DIY enthusiasts can make errors during installation; here are some common pitfalls:
1. Skipping Safety Precautions
Always prioritize safety by wearing protective gear and ensuring that children and pets are kept away during installation.
2. Misreading Instructions
Take your time reviewing manuals; don’t rush through this vital step.
3. Ignoring Professional Help When Needed
Sometimes calling in commercial garage door services is necessary—especially if electrical work is involved or if springs need adjusting.
Maintaining Your New Garage Door Opener
Once installed, maintaining your new opener can extend its lifespan significantly:
1. Regular Inspections
Check screws and bolts monthly—tighten them as needed.
2. Lubrication
Use lithium grease on moving parts every few months to reduce friction.
3. Testing Safety Features
Test photoelectric sensors regularly to ensure they function correctly—they're crucial for safety!
FAQs About Replacing Garage Door Openers
Q1: How long does it take to replace a garage door opener?
A: Typically, expect around 2–4 hours depending on experience level and complexity of installation.
Q2: Can I use my existing remote with my new opener?
A: Most likely! But check compatibility before purchasing your new unit.
Q3: What should I do if my new opener won’t work?
A: Review troubleshooting guides included in manuals or contact garage door repairs services nearby for assistance.
Q4: Is professional help worth it?
A: Yes! Especially if you're uncomfortable handling electric components or heavy machinery—consider calling professional garage door services if needed.
Q5: Can I install a smart garage door opener myself?
A: Absolutely! Just ensure your home Wi-Fi signal is strong enough where you'll install it.
Q6: Are there any warranties available on new openers?
A: Most reputable brands offer warranties covering parts or motors—check specifics before purchasing!
Conclusion
Replacing your garage door opener doesn’t have to be daunting—it can even be rewarding! By understanding how easy it is to replace a garage door opener through this DIY guide, you've equipped yourself with knowledge that makes tackling home improvement projects manageable.
However, remember that sometimes enlisting help from garage door services Los Angeles CA might save time and prevent mishaps down the line; there’s no shame in asking for assistance when necessary!
Arming yourself with information not only enhances your skill set but also boosts confidence in managing home repairs effectively—from simple tasks like replacing an old fixture to more complex installations requiring professional knowledge! So roll up those sleeves, gather those tools—and get ready to conquer that project head-on!
Keep this guide handy as you embark on making that replacement happen—you’ve got this!