
Best Mold Cleaning Methods, Costs, and Professional Removal Explained
Mold grows fast in South Florida. A small leak behind a vanity, a clogged AC drain line, or a roof drip after a Pembroke Pines thunderstorm can lead to spotting on baseboards or a musty closet in a week. If you search for mold cleaning tips, you’ll see strong opinions on bleach, vinegar, and ozone machines. Some work in narrow cases. Others hide the problem and let spores spread.
This article breaks down what homeowners in Pembroke Pines, FL really need to know. You’ll see which DIY mold cleaners actually help, where they fail, what safe cleanup looks like, and what honest pricing tends to be for professional service in Broward County. You’ll also learn how pros like Tip Top Plumbing & Restoration handle containment, filtration, and clearance to protect your family and your home value. Along the way, you’ll get candid decision points: when to handle a spot yourself and when to call for help.
Why mold is different in Pembroke Pines
Our climate sets the stage. Warm air with high humidity feeds mold. Afternoon storms pass, the sun returns, and moisture lingers in wall cavities and behind cabinets. Many homes run the AC hard, but indoor humidity still hovers near 60 percent if the unit is oversized or the system short cycles. Add plumbing materials common here — copper pinhole leaks in older homes, CPVC joints in newer builds, and rubber washer failures — and mold finds a home.
I see three common patterns in Pembroke Pines:

- Bathroom or laundry room spotting after a slow plumbing leak. Think wax ring seep at a toilet, a cracked supply line, or a drain trap drip.
- Ceiling patches following roof or flashing leaks during summer storms.
- AC closet or hallway return issues. Condensation and dust form a biofilm along drywall and air handler stands.
Each of these rewards quick attention. Delay turns a surface wipe into a wall cut and insurance paperwork. Quick action also limits cross-contamination into bedrooms and closets.
What counts as “mold cleaning” and what does not
Mold cleaning often gets confused with stain removal. True mold remediation has two goals: remove active growth and stop the moisture that feeds it. If you only bleach a surface, you might fade the stain but leave hyphae embedded in drywall paper or wood fibers. The growth returns as soon as the area gets damp again.
Functional mold cleaning has three parts:
- Fix the water source. Without this step, you are buying time, not solving the issue.
- Remove and dispose of porous materials that are colonized. Drywall, carpet pad, and insulation usually need to go if they are moldy.
- Clean and treat remaining non-porous or semi-porous surfaces so spores and fragments do not linger.
Keep this in mind while comparing DIY products and professional methods. The best cleaner fails if moisture remains.
DIY mold cleaners that actually work (and where they fail)
You can handle small mold on hard, non-porous surfaces if you catch it early. “Small” means growth you can cover with a standard bath towel. This is a rule of thumb many insurers and Florida remediators use because anything larger suggests hidden spread.
Vinegar has a strong following. A white distilled vinegar with 5 percent acetic acid can help on tile, glass, and metal. It penetrates biofilm better than bleach and can reduce viable spores on the surface. Spray full strength, let it dwell for 10 to 15 minutes, wipe with disposable towels, then rinse. The downside is odor and limited power on porous materials. It can also etch some natural stone and dull finishes.
Hydrogen peroxide at 3 percent works well for visible mold on caulk lines, shower grout, and refrigerator gaskets. It foams on contact, which helps lift debris. Flood the area, allow a 10-minute dwell, then wipe. It brightens stains better than vinegar. It still cannot fix colonized drywall or carpet.
Quaternary ammonium (“quat”) cleaners are common in hospital disinfection. Household versions marketed as bathroom or kitchen disinfectants list ammonium compounds on the label. They are effective on hard surfaces and leave a mild residue that interferes with regrowth. They need proper contact time. Read the label for dwell time; many need 5 to 10 minutes of wet contact. Keep pets and kids away until the surface is dry.
Bleach has a narrow use. On glazed tile, porcelain tubs, and sealed concrete, a diluted bleach solution can knock down visible mold and lighten stains. It is not a wood or drywall cleaner. On porous surfaces it reacts with the surface layer, leaves water behind, and often pushes moisture deeper. Many homeowners bleach a baseboard, it looks clean, and then the shadow returns two weeks later. Bleach also reacts with acids and ammonia, so do not mix it with other cleaners. Use ventilation and PPE if you choose it.
Baking soda and borax get praise because they raise pH and make surfaces less friendly to mold. Borax mixed with water makes a mild alkaline solution that can help lift residue and deodorize. Borax is less corrosive than bleach and leaves a residue that can slow regrowth on non-porous surfaces. It still does not cure a wet wall cavity.
Here is the practical boundary: if your fingernail can dent the material and it has mold, DIY surface cleaning is a temporary bandage. Drywall paper, MDF baseboards, and carpet pad are porous. If they show visible mold, they usually need removal within a controlled zone.
Safety basics many DIY guides skip
Even a small cleanup can aerosolize spores and fragments. That matters for kids with allergies, older adults, or anyone with asthma. Put on a disposable Click here! N95 or, better, a P100 respirator. Use nitrile gloves and eye protection. Keep the AC off during cleaning if possible, and close the supply vents in the work area to reduce spread. Bag used towels and any removed materials in thick contractor bags and take them straight outside.
Avoid dry brushing and vacuuming unless you have a HEPA vacuum. A regular shop vac will blast fine particles out the exhaust. If you own a HEPA unit, vacuum after wet wiping. Work in the same direction each pass and fold your towels often to keep from smearing.
How to decide: DIY or call a pro
You can use size, material, and moisture to make a clear decision without guesswork. If the contaminated area is larger than a towel, or if the wall feels soft, it is time to consider professional help. If you smell musty odor but cannot see mold, you need an inspection. If the source is unknown and your moisture meter reads over 16 to 18 percent in the wall, you likely have hidden growth.
In Pembroke Pines homes, we also consider air conditioning design. A supply duct aiming at a wall can cool the surface below dew point. That condenses water and feeds mold even without a leak. If you see growth on exterior walls around vents, a pro should check insulation, airflow, and relative humidity before any cosmetic fix.
Insurance also matters. Many policies in Florida limit mold coverage to a specific dollar amount, often $5,000 to $10,000, and require professional remediation for coverage. If you open a wall yourself and increase the affected area, you can run into a denial. A quick call to your agent and a documented pro inspection can protect you.
What professional mold remediation looks like
Professional mold cleaning in a Pembroke Pines, FL home follows a predictable sequence. The details change by room and material, but the blueprint stays the same: inspection, containment, negative air, removal, cleaning, drying, and clearance.
First comes the inspection. A licensed remediator checks moisture with a meter and thermal camera, pulls baseboards to look for hidden wicking, and tests relative humidity. We do not rush to test air unless we suspect a widespread issue; visual and moisture data drive the initial plan.
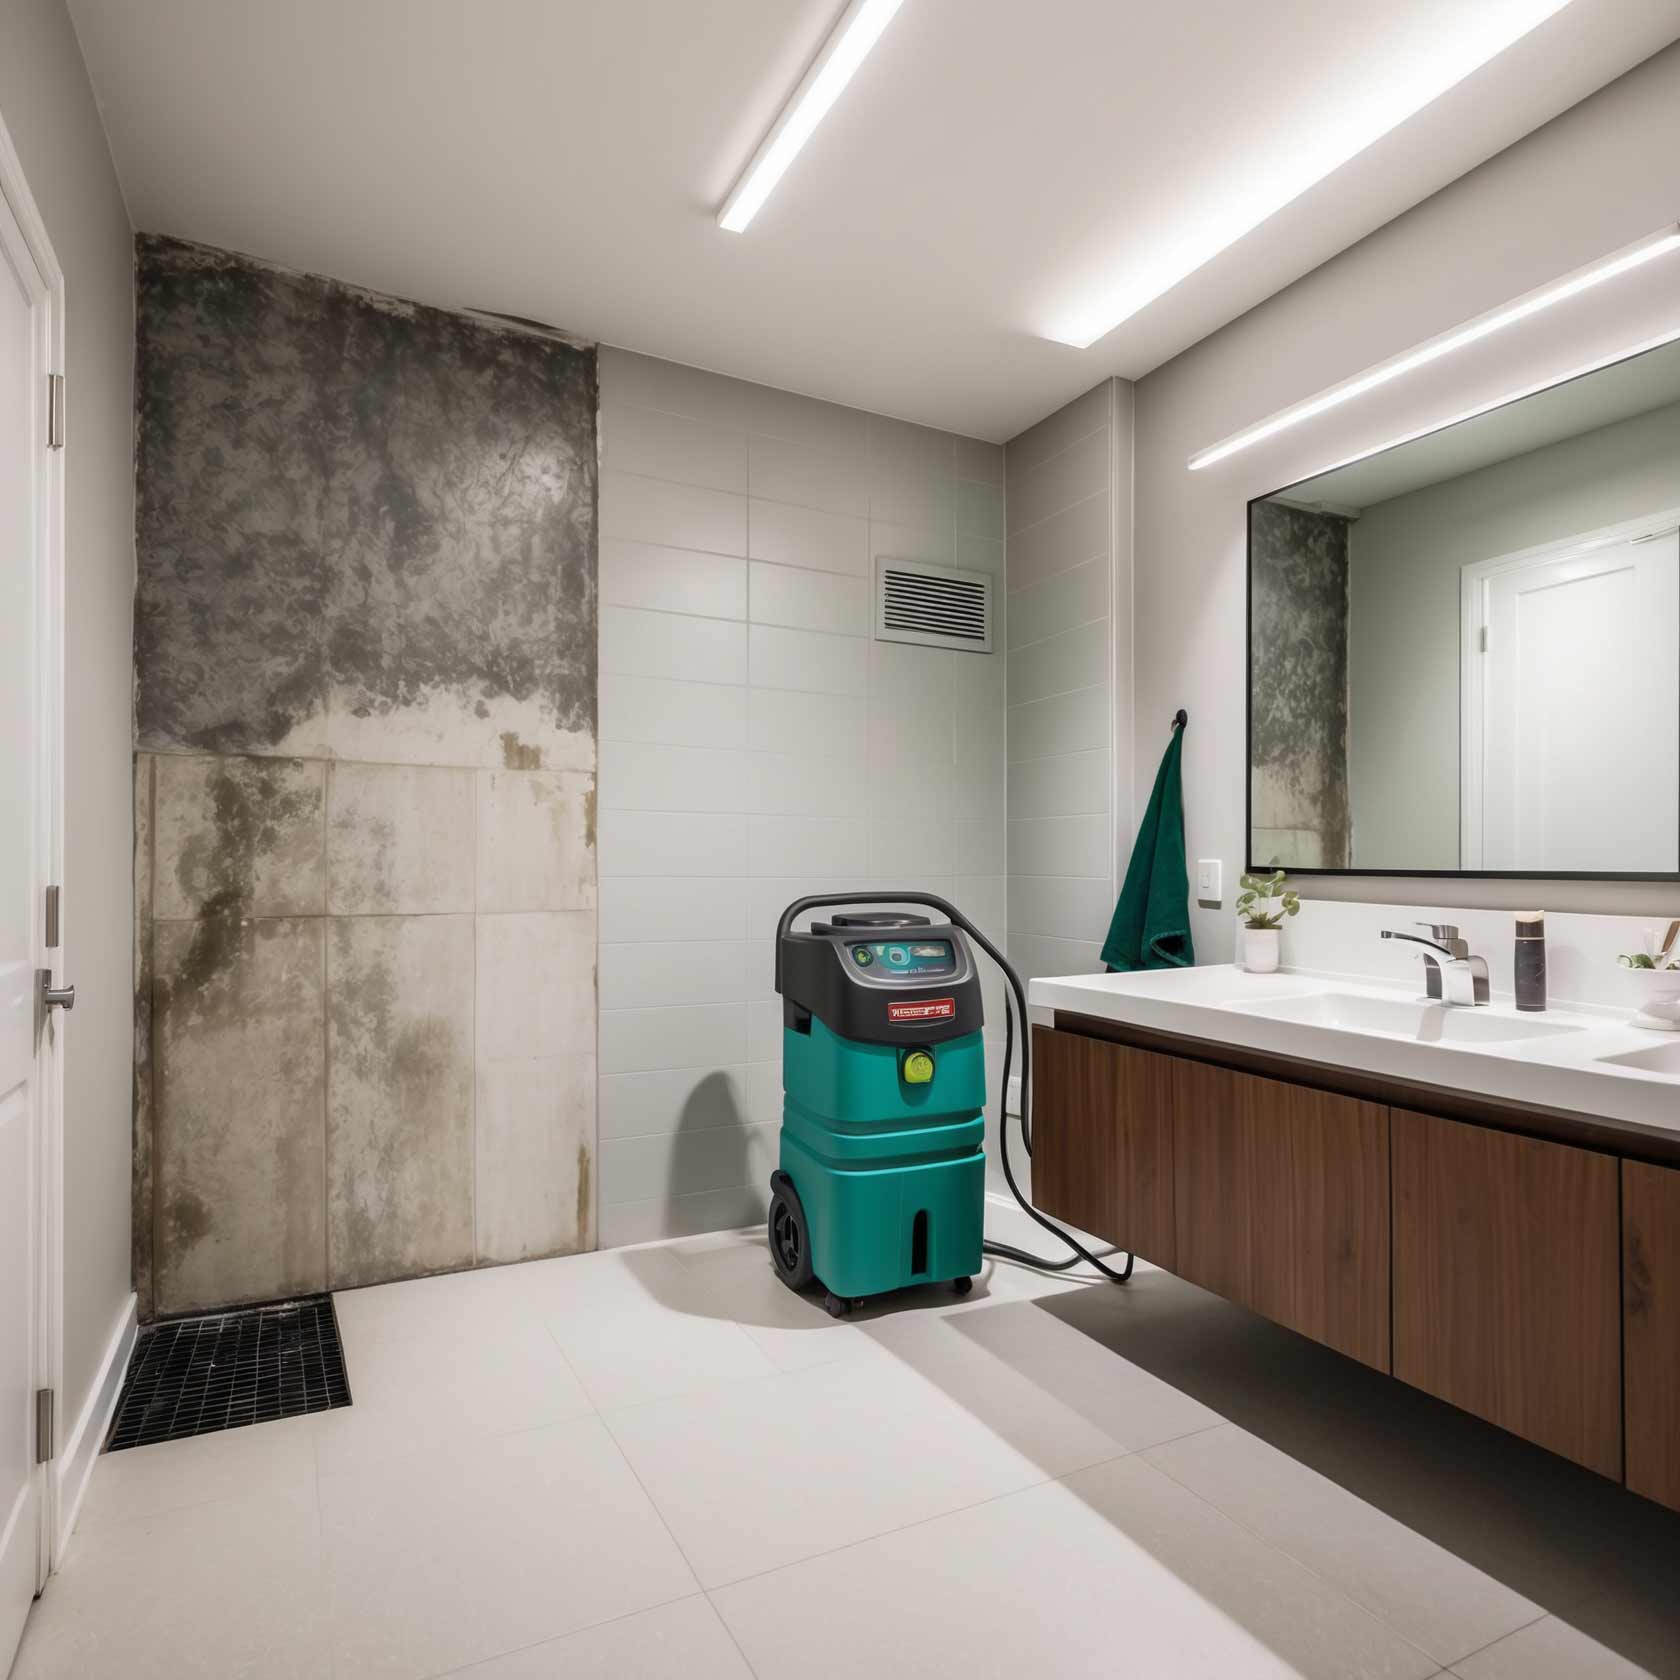
Containment is next. Pros build a plastic enclosure around the work area and seal off vents. A HEPA-filtered negative air machine pulls air from the chamber and exhausts it outside or through a HEPA filter to reduce airborne spread. In small bathrooms, we can build a simple door zipper wall. In larger living rooms or kitchens, we set up full-floor containment.
Removal targets porous materials with visible or suspected mold. Cut lines follow stud centers. We bag drywall, insulation, and carpet pad inside the containment before moving them out. If cabinets are involved, we evaluate the boxes. Plywood boxes sometimes clean well. Particleboard bottoms often swell and need replacement.
Cleaning starts with HEPA vacuuming on all exposed surfaces. This includes studs, subfloor, and the inside of remaining drywall edges. Then we wet-wipe with an EPA-registered antimicrobial or a hydrogen peroxide-based cleaner and allow proper dwell time. If an odor lingers, we may apply a second pass after drying. We avoid fogging the entire home because it can move residues onto clean items.
Drying matters. Even after removal and cleaning, wood can hold moisture. We set up dehumidifiers and directed air to bring materials below 15 percent moisture content before closing the wall. Skipping this step invites a comeback.
Clearance can be formal or informal. For larger projects or insurance claims, a third-party assessor performs air sampling or surface sampling after we finish and the area is dry. For small projects, we perform a visual clearance and document moisture readings. Either way, no one should rebuild until the area is clean and dry.
The cleaners and tools pros trust
Homeowners often ask what magic product we use. It is less about magic and more about process. That said, professionals rely on a few consistent tools.
HEPA filtration is non-negotiable. We use true HEPA air scrubbers and vacuums that capture 99.97 percent of particles down to 0.3 microns. This handles spores and fragments created during removal. A household HEPA vacuum can help after the fact, but it won’t replace negative air during demolition.
EPA-registered antimicrobials matter. We select products with clear labels for fungi and defined dwell times. Quat-based cleaners and hydrogen peroxide blends both show strong results on construction materials when used properly. We avoid soaking wood. Light, controlled application followed by dry time gives better outcomes.
Stain removers have a role. After cleaning, a peroxide brightener can reduce the shadow on wood framing. We do not chase every stain. Color is not growth. If a board is structurally sound, dry, and clean, we leave it.
Encapsulants are a judgment call. On old framing with residual discoloration, we may apply a mold-resistant coating to lock down residual particles and improve future cleanability. We do not use encapsulants to hide active mold or wet materials.
Borescopes and moisture meters guide cuts. Guesswork makes jobs bigger and more expensive. We prefer small, focused openings that track moisture gradients, then expand as needed.
Honest cost ranges in Pembroke Pines, FL
Costs vary by square footage, access, materials, and whether plumbing repair is required. Here are ranges we see across Pembroke Pines neighborhoods like Silver Lakes, Chapel Trail, and Pembroke Falls. These reflect typical residential projects and 2024–2025 market rates.
A small bathroom patch under 10 square feet with no cabinet removal runs $450 to $900. This includes containment, HEPA air, removal of a section of drywall, cleaning, and drying. If we also fix a basic plumbing leak such as a P-trap replacement or a toilet wax ring, add $150 to $350 for parts and labor.
A laundry room wall section with baseboard and some insulation replacement often lands between $900 and $1,800. If the washer supply hoses failed, we include shutoff replacement and braided hose upgrades. Plumbing parts add $75 to $150.
Kitchen sink cabinet issues vary widely. If the sink base is salvageable and the growth is limited to the back wall, expect $1,200 to $2,200. If particleboard cabinets are swollen and need replacement, total costs rise with carpentry. Many homeowners use this as a chance to upgrade, which shifts the budget.
AC closet or hallway return work often costs $1,200 to $2,500 because we address condensation, air leaks, and sometimes add a secondary drain pan or clean the stand. We coordinate with your HVAC tech to verify airflow and humidity. If your unit needs a drain flush and float switch, that can be an extra $150 to $300.
Larger living room or multi-room containment with ceiling cuts after a roof leak can reach $3,000 to $6,000. This reflects several days of negative air, insulation removal, and drying. Roofing repair is separate; if you already have a roofer on site, we line up schedules to limit downtime.
Third-party testing, if requested by you or required by your insurer, typically costs $250 to $600 for a small project, more if multiple samples or rooms are involved.
These numbers assume standard access and no asbestos or lead paint complications in older homes. We always confirm scope after a moisture and visual assessment. For insured losses, we document with photos, readings, and a line-item estimate for your carrier.
Timing and risk: how fast to act after a leak
Mold growth can begin within 24 to 48 hours in our climate. The clock starts when materials are wet. If you discover a plumbing leak, shut off the water, remove standing water, and start dehumidification that day. Pull baseboards where water pooled and check the drywall with a meter or a simple push test. If drywall feels spongy, it is often cheaper to cut a neat strip and dry the cavity than to hope it recovers.
For AC-related condensation, address humidity and airflow immediately. Set your thermostat fan to auto, not on, so the coil can drain between cycles. Aim for indoor relative humidity under 55 percent. A small portable dehumidifier in problem rooms can help in the short term, especially during rainy weeks.
What bleach myths get wrong
I still meet homeowners who swear bleach kills everything. It is a strong oxidizer, and it has a place on glazed tile or sealed concrete, but several myths cause harm. Bleach is mostly water. On porous surfaces, water can soak in while chlorine off-gasses. This leaves moisture behind that feeds mold. Bleach can also damage the lignin in wood and make grain fuzz, which traps dust.
Another myth says a single wipe fixes the problem. Mold cleaning requires dwell time. With any cleaner, the surface must stay wet for the labeled minutes. Wiping dry too fast does little besides smear and lighten stains.
Finally, people assume the lack of visible color means success. Mold color comes from pigments and stains and often remains long after growth is dead. A stain does not mean failure. What matters is whether the material is clean to the touch, dry to the meter, and looks neat enough for a rebuild.
How we protect your home during professional work
Homeowners worry about mess, noise, and fumes. A good crew keeps disruption under control. We set clear containment with zipper doors and floor protection. We run negative air to keep dust inside the work zone. We choose cleaners with low odor when possible, and we ventilate well when stronger agents are necessary.
We also coordinate with your schedule. Many small jobs finish in a day. Drying might run an extra day with equipment in place. We check in morning and evening to log moisture and answer questions. You will know what happens before we do it.
Documentation matters. We record pre-existing conditions, leaks, and any visible microbial growth with time-stamped photos. This helps with insurance and resale. Buyers appreciate proof that a licensed firm corrected the moisture and removed damaged materials.
Preventing mold after the fix
In Pembroke Pines, prevention is about drainage, airflow, and maintenance. Keep gutters clean and downspouts directed away from the slab. Seal penetrations for hose bibs and dryer vents. Inside, run bathroom exhaust fans during and after showers. Check under sinks monthly for dampness or swelling. Replace rubber washing machine hoses with braided stainless lines and shut off water to the machine if you leave town.
For AC, service the drain line every few months. A cup of distilled white vinegar poured into the condensate line can reduce slime buildup. Make sure your thermostat does not overcool. If you see condensation around vents or on walls, call for an HVAC evaluation. Poor balance and leaky returns are common sources of persistent humidity issues in our area.
What to expect during a Tip Top Plumbing & Restoration visit
A site visit starts with a focused interview. We ask where you noticed odor or stains, how long the issue has been present, and what changes you made recently, such as a new dishwasher or thermostat setting. Then we inspect with moisture meters and infrared to map the wet zone.
If the problem is small and suitable for DIY, we say so and give you a cleaning plan with safe products and steps. If professional mold cleaning is justified, we outline the scope, containment location, and estimated time. If plumbing repair is needed, we handle it on the same trip whenever possible so you do not coordinate multiple vendors.
We quote clearly. No vague ranges once we see the space. If conditions change when a wall opens, we pause and show you. You will never wonder where the price came from or what happens next.
A quick homeowner checklist for first 24 hours after discovering mold
- Stop the moisture: shut off leaking water, dry visible puddles, and run a dehumidifier.
- Isolate the area: close doors, cover vents, and limit foot traffic around the spot.
- Document: take photos and a short video, including any meter readings if you have a meter.
- Avoid spreading: do not dry-sand, brush, or vacuum with a non-HEPA machine.
- Call a local pro if the area is larger than a towel or the source is unclear.
Real question from a Pembroke Pines homeowner
A client in Parkside at Spring Valley called about a musty smell in a guest room. No water stains, but the smell was stronger near the baseboard behind a dresser. Our meter read 20 percent moisture along a three-foot section. The cause was a pinhole leak in a copper line for the adjacent bathroom. We set a small containment, opened the wall, replaced about four feet of drywall and insulation, cleaned and dried the studs, and fixed the plumbing. Total time was two days with equipment running overnight. The invoice for mold cleaning and plumbing combined came to $1,650, which fit the homeowner’s mold endorsement. They kept the dresser and avoided any spread to the carpet or closet.
Local SEO note: how fast we can be at your door in Pembroke Pines
We stage crews near Pines Boulevard and I-75 for fast access to Chapel Trail, Silver Lakes, Pembroke Shores, and Pembroke Isles. Most calls get a same-day assessment. Evening and weekend slots are available for active leaks or urgent mold cleaning needs. If you’re in Miramar, Weston, or Cooper City, we cover those areas too, but our fastest response is inside Pembroke Pines city limits.
What to ask any mold company before hiring
You do not need jargon. You need clear answers. Ask if they build containment, use HEPA negative air, and document moisture before and after. Ask whether they can fix the leak that caused the issue, or if you need a separate plumber. Ask how they protect clean rooms, and whether they recommend third-party clearance for your case. A straight answer is a good sign. Pressure to start demo without a plan is not.
Ready for a straightforward plan?
If you see mold spots, smell that earthy odor, or just want a second opinion, call Tip Top Plumbing & Restoration. We combine plumbing repair with mold cleaning so the source and the symptoms get handled in one visit. You’ll get a clear scope, an honest price, and clean documentation you can share with your insurer or buyer.
Book your inspection today. We serve homeowners across Pembroke Pines, FL — from Silver Lakes to Pasadena Lakes and everything between — with same-day service and careful, practical methods that keep your home clean and your project on track.
Tip Top Plumbing & Restoration provides plumbing repair, drain cleaning, water heater service, and water damage restoration in Pembroke Pines, Miramar, and Southwest Ranches. Our licensed team responds quickly to emergencies including burst pipes, clogged drains, broken water heaters, and indoor flooding. We focus on delivering reliable service with lasting results for both urgent repairs and routine maintenance. From same-day plumbing fixes to 24/7 emergency water damage restoration, Tip Top Plumbing & Restoration serves homeowners who expect dependable workmanship and clear communication. Tip Top Plumbing & Restoration
1129 SW 123rd Ave Phone: (954) 289-3110
Pembroke Pines,
FL
33025,
USA